
Choosing the best consulting company for your Salesforce project *in 3 simple steps*

(Inspired by George Gammon’s style of teaching macroeconomics in 3 simple steps in his YouTube videos)
STEP #1
Go to the AppExchange and click the Consultants tab:

https://appexchange.salesforce.com/consulting
STEP #2

On the left side Filters:
- select your Country
- uncheck all Ratings except 5 stars
- uncheck Global Strategic (*)
- click Apply Filters
STEP #3

On the top right side Sorting options:
click to Sort by Rating – important!
Now you have a good list of consulting companies to contact.
BONUS STEP
Open the page for each of the best rated consulting companies, click the Expertise tab and look for “Architect Certifications” and “Developer Certifications“.

At this 5-Star Rating level, the majority of consulting companies have people certified as Admin, Consultant and Marketing so the greatest distinction is having people certified as Architects and Developers – they are harder to hire and have passed the hardest exams.
Those are people who invested more time and effort acquiring expertise in the platform.
(*) This article is considering small, medium, nationwide businesses and medium-sized departments/divisions.
The goal is to not spend a lot of time contacting a number of consulting companies who might not be as nimble.
If you leave Global Strategic checked, you will be dealing with big consulting companies and will likely have higher costs and lengthier projects.

Easy 3D hyperlink buttons using SVG VisualForce pages
This article gives an example of how to use an SVG VisualForce page to generate images for buttons.
The button is a formula that uses HYPERLINK() and IMAGE() functions that link to a VisualForce page passing parameters color and text.
HYPERLINK( “/” + Id + “/e”
, IMAGE( “/apex/ButtonImage?color=”
+ CASE( TEXT( Industry ), ‘Retail’, ‘darkgreen’, ‘Food & Beverage’, ‘orange’
, ‘Apparel’, ‘blue’, ‘Entertainment’, ‘cyan’, ‘red’ )
+ “&text=Edit+”
+ SUBSTITUTE( Name, “&”, “%26amp;” ) + “.”, “Test” ), “_self” )
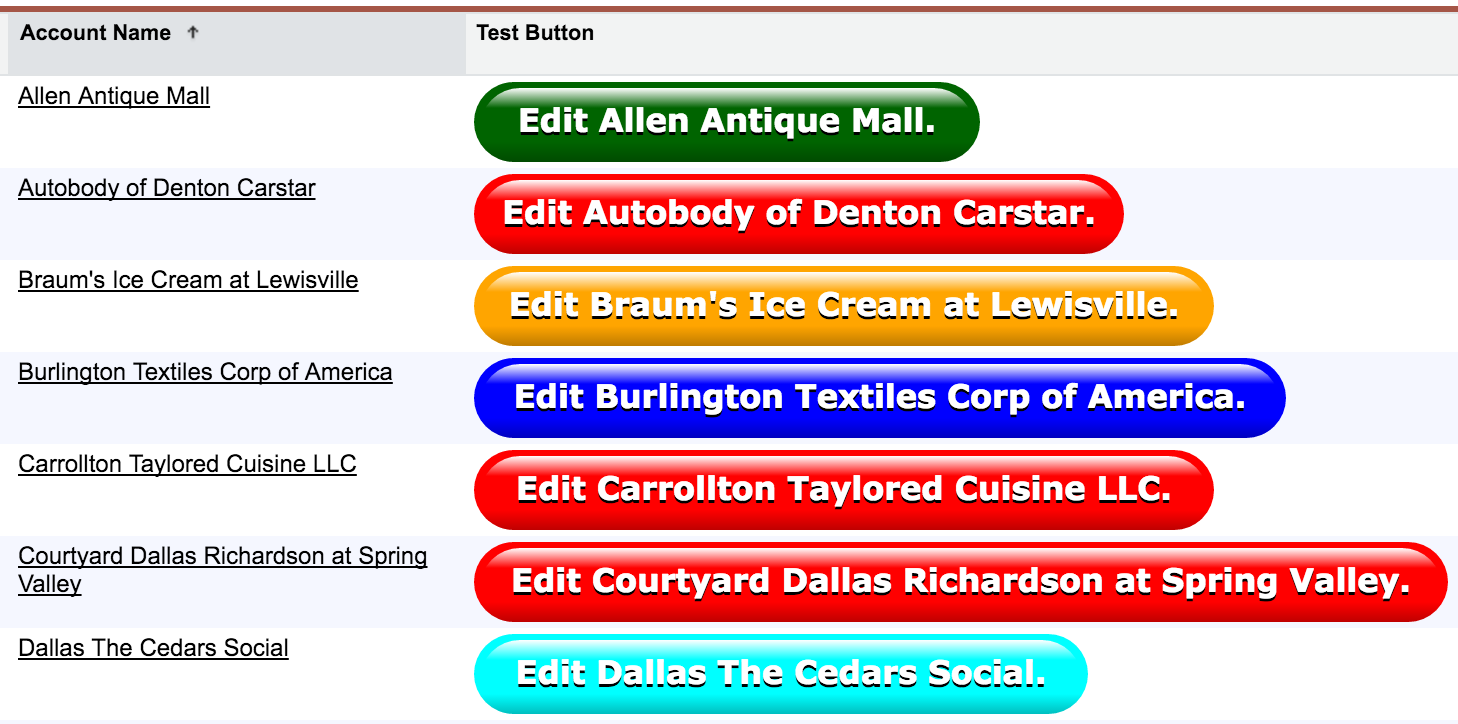
The result is shown below in a report: the VisualForce page renders a button varying the color according to the Account.Industry field and the text “Edit <Account.Name>”.
It requires this simple VisualForce page with no controller (GitHub link below):
As explained in the first article of this series, this is a VisualForce page that uses the Scalable Vector Graphics format to specify an image using plain XML.
In addition to that, the page uses a few interesting resources to create a button image with 3D effect:
- apex:variable tags to calculate the size of the image based on the length of the text, and sets default colors when parameters are missing
- linearGradient tags (SVG) to create a highlight at the top of the button and a shadow at the bottom
- rect tags (SVG) to create the button itself and add the gradient effects to make the button appear 3D-like
- text tags (SVG) to display the button text with a shadow (more easily noticed when the color is light like the cyan button above)
There is a quick tutorial on SVG available on w3schools.com
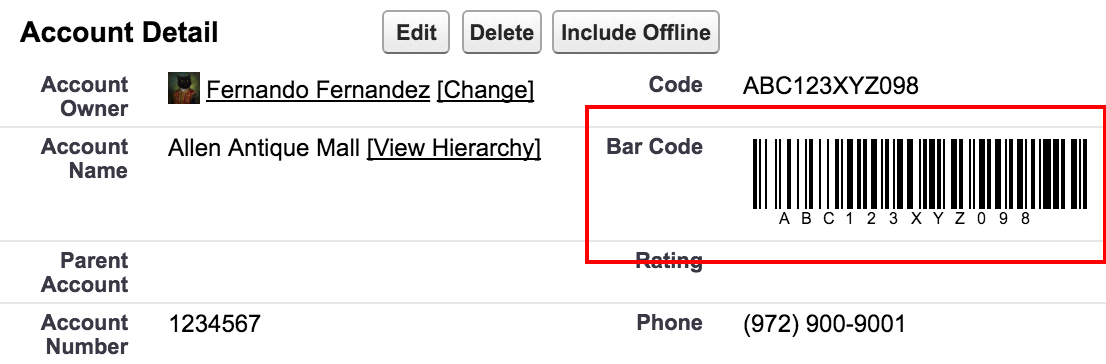
The next article will show an example of how barcodes can be dynamically rendered by an SVG VisualForce page to be used in reports and page layouts.

Bending fields to our will in reports and page layouts with SVG VisualForce pages!
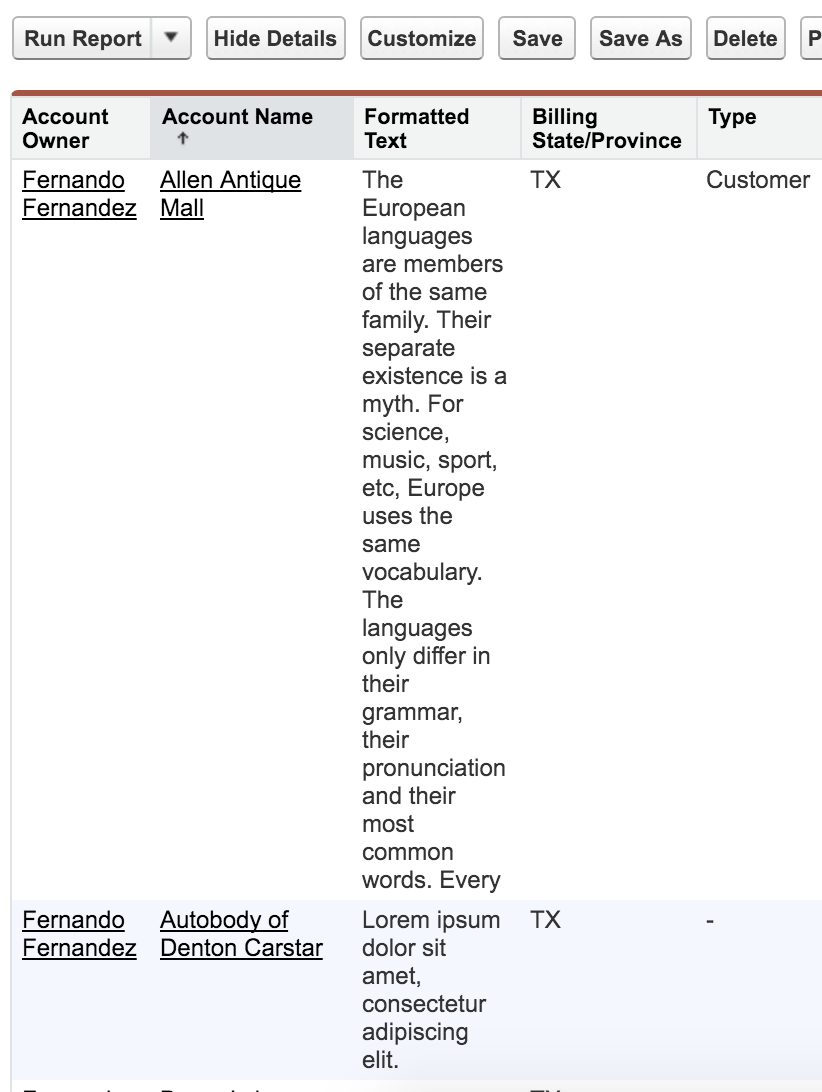
If you add a long text field to a report, you may end up with something undesirable like the image below: a field of plain text squeezed and stripped of any formatting.
The “normal” way of fixing that would be to create a plain text field and use a workflow to copy the first 255 characters of the long text field to it – that is, truncating the long text field.
This article shows another way of overcoming that limitation and making long text fields display with a fixed size and word wrap and in color without truncation.
In the previous article it was shown how to display formatted text using a VisualForce page that accepted parameters and converted text to a SVG image.
Now that idea will be expanded: create a page that will accept any field from any object and generate an image after applying word wrap and color to its text value. The result is below:

Much nicer!
Here is how it was done: an IMAGE formula field (below) that sends parameters to a VisualForce page which returns a SVG image.
IMAGE( ‘/apex/FieldToImage?wrap=60&color=’
+ IF( CONTAINS( ‘Energy|Construction|Transportation|Shipping|Utilities|Manufacturing|Agriculture’, TEXT( Industry ) ), ‘red’, ‘green’ )
+ ‘&object=Account&fieldName=description&id=’ + Id, ‘Color Description’ )
Please notice the following parameters passed to the FieldToImage VisualForce page:
- wrap=60 – this limits each line to 60 characters
- color= red or green, depending on the Account Industry – self-explanatory
- object=Account – this tells the page controller to retrieve data from the Account
- fieldName=description – this tells the page controller to retrieve data from the Account.Description field
- id= the Account ID – self-explanatory
Instead of passing the text directly to the page, we passed the names of the object and field because formulas cannot reference long text fields directly (by the way, this idea needs more upvotes).
The code that implements the page and controller is here (GitHub links):
The Apex controller uses the parameters “object”, “fieldName” and “id” to create a dynamic SOQL query. It then fetches the text from the object and substitutes a couple of special characters in order to not break the SVG syntax.
// fetch the field and convert to text
List<SObject> objList = Database.query( ‘SELECT ID, ‘ + fieldName
+ ‘ FROM ‘ + objectName + ‘ WHERE ID = \” + theID + ‘\’ LIMIT 1′ );
if( objList.size() <= 0 ) {
return;
}
String rawText = String.valueOf( objList[ 0 ].get( fieldName ) );
if( rawText == null ) {
return;
}
rawText = rawText.replace( ‘<‘, ‘<’ ).replace( ‘&’, ‘&’ );
This idea can be expanded to make the VisualForce page return and display long text from related records or combined with parent records.
This is something that is not possible to do with just a formula since long text fields cannot be referenced in formulas and there are limited ways of accessing children records in the context of a page layout or report.
The next article will show a way to create dynamic hyperlink buttons – like the ones below – to display on page layouts and reports:


Colors in reports and page layouts with SVG VisualForce pages
Other than using Rich Text fields, there are rigid limits in regards to how fields appear on a page layout or report.
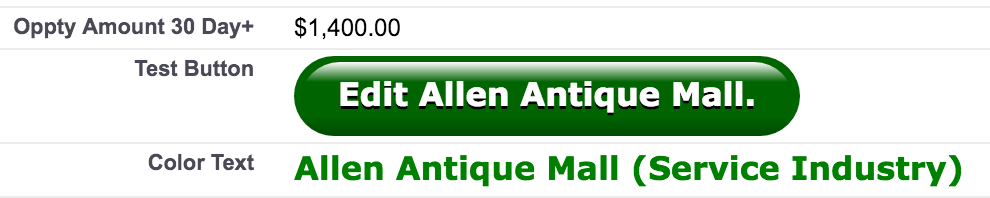
In the Account report below, you can see a text field that appears in different colors depending on the industry of the account. This article shows one way to obtain that functionality.
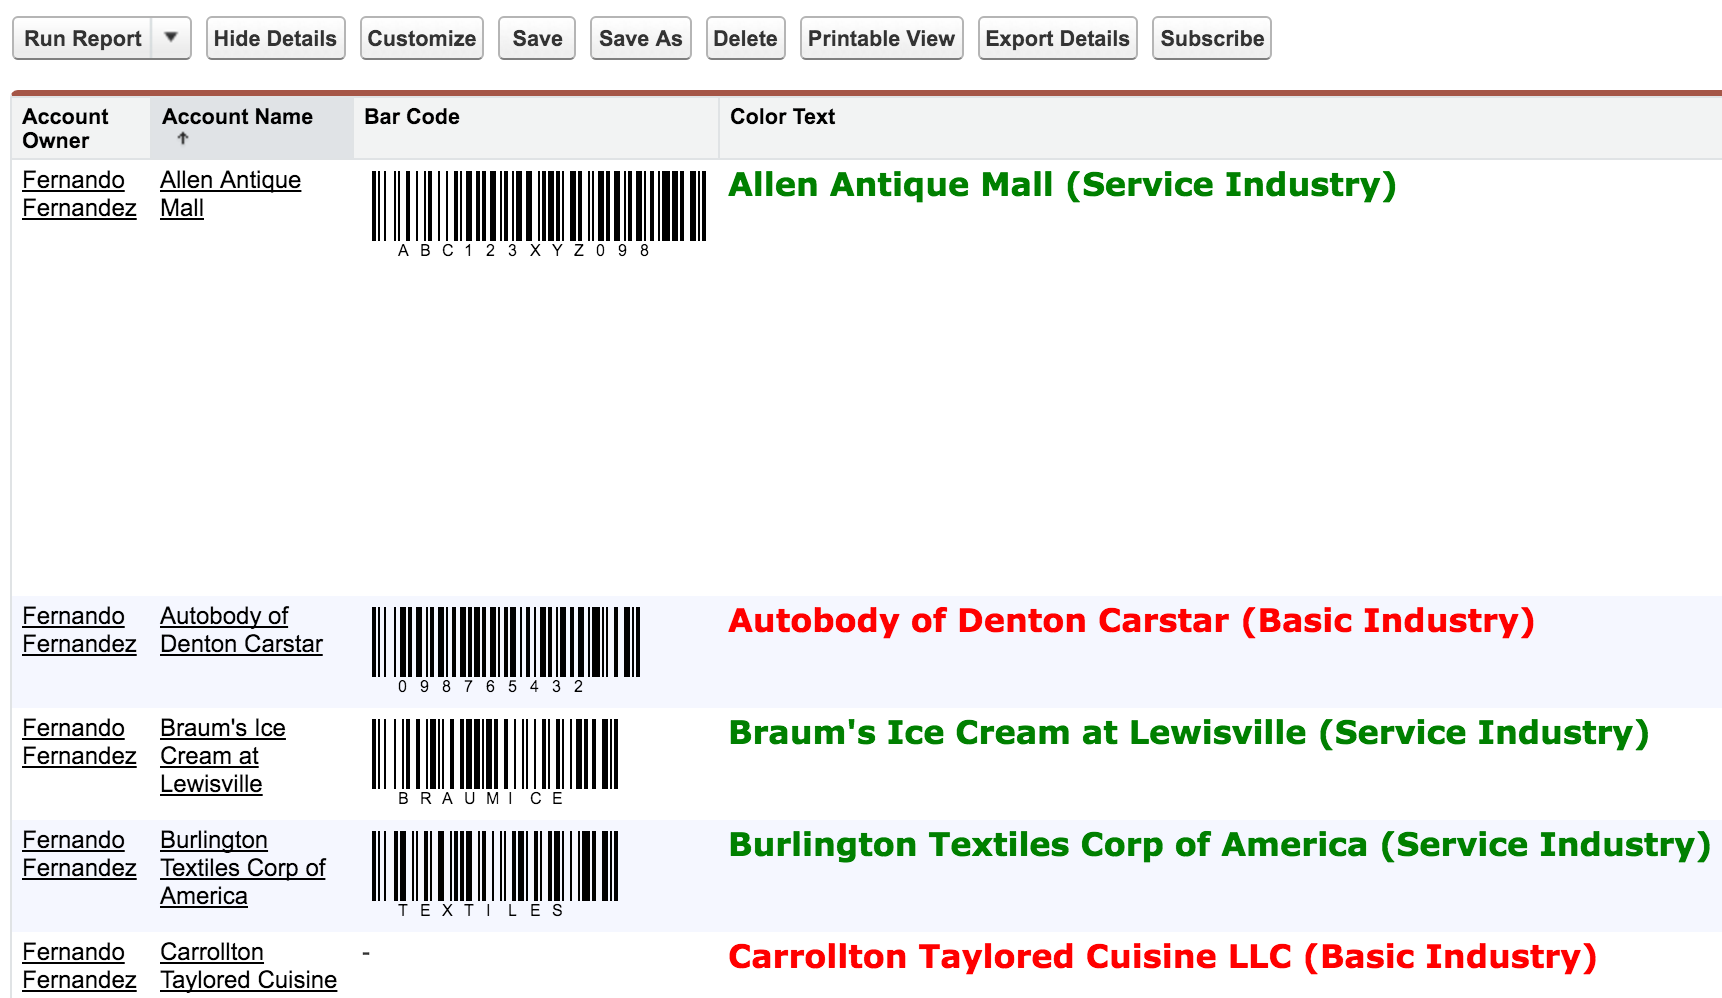
Below is the formula used to display the colored text:
IMAGE( “/apex/TextToImage?color=”
+
IF( CONTAINS( ‘Energy|Construction|Transportation|Shipping|Utilities|Manufacturing|Agriculture’, TEXT( Industry ) ), ‘red’, ‘green’ )
+ “&text=”
+ SUBSTITUTE( Name, “&”, “%26amp;” ) + ” (”
+ IF( CONTAINS( ‘Energy|Construction|Transportation|Shipping|Utilities|Manufacturing|Agriculture’, TEXT( Industry ) ), ‘Basic’, ‘Service’ ) + ” Industry)”, “Test” )
Notice how it starts with an IMAGE() function with a concatenation of:
- a link to a VisualForce page
- a parameter “color” followed by…
- …an IF() function that determines whether the text should appear in red or green
- a parameter “text” followed by…
- …a SUBSTITUTE() function that replaces any “&” character in the Account Name with an equivalent escape code
- another IF() function that determines whether to append the words “(Basic Industry)” or “(Service Industry)” depending on the picklist value of the Account Industry
That is right, this formula transforms a text field into an image using a VisualForce page! How is that possible?
Here is the page markup for TextToImage:
<apex:page sidebar="false" showHeader="false"
 applyHtmlTag="false" applyBodyTag="false"
 standardStylesheets="false"
 ContentType="image/svg+xml" >
    <apex:variable var="textWidth"
         value="{! LEN( $CurrentPage.parameters.Text ) * 10 }"/>
    <apex:variable var="textColor"
         value="{!IF( $CurrentPage.parameters.Color = null,
                  'red', $CurrentPage.parameters.Color )}" />

    <svg id="layer_1"
        xmlns="http://www.w3.org/2000/svg"
        xmlns:xlink="http://www.w3.org/1999/xlink"
        height="20" width="{! textWidth }">
      <text x="0" y="15" font-family="Verdana"
          font-weight="bold" fill="{! textColor }">
          {! $CurrentPage.parameters.Text }
      </text>
    </svg>
</apex:page>
In this page there are 3 unusual things:
- no controller, no header, no sidebar, no style sheet
- the ContentType is set to image/svg+xml
- the SVG tag containing a TEXT tag
The SVG image format – Scalable Vector Graphics – is relatively less known standard but it is very versatile and compatible with virtually all browsers. It allows us to define an image using plain XML.
In order to generate an image, this VisualForce page uses the parameters Text and Color. Color can be any CSS color code such as #FF00FF, #00A0C0, etc or a CSS color name such as red, green, darkblue, etc.
An URL like below would make the text “This is a test.” appear in cyan:
/apex/TextToImage?color=cyan&text=This+is+a+test.
![]()
This way of manipulating text with SVG opens the door to a few ideas and allows interesting features that will be explored in the next articles… (hint: check out the bar codes in the first image!)
3 Steps to optimize a complex formula in Salesforce
This article was also posted in LinkedIn: 3 Steps to optimize a complex formula in Salesforce.
The formula below was created straight from the client requirements and didn’t fit the maximum formula size (5k bytes) when compiled.
It was intended to display a red, yellow or green square depending on how many days the account was past due and according to the type of the account.
Here are 3 steps to optimize it to fit the limit.
IF(
ISBLANK(Type__c),
IMAGE(“/img/samples/color_red.gif”, “Red”, 10, 10),
IF(
OR(
(Type__c = “TA”),
(Type__c = “DB”),
(Type__c = “AC”)),
IMAGE(“/img/samples/color_red.gif”, “Red”, 10, 10),
IF(
(Amount__c < 1), IMAGE(“/img/samples/color_green.gif”, “Green”, 10, 10), IF( AND( (Type__c = “C2”), (Amount__c > 1),
(Days_Past_Due__c <= 7)), IMAGE(“/img/samples/color_yellow.gif”, “Yellow”, 10, 10), IF( AND( (Type__c = “C2”), (Amount__c > 1),
(Days_Past_Due__c > 7)),
IMAGE(“/img/samples/color_red.gif”, “Red”, 10, 10),
IF(
AND(
OR(
(Type__c = “PC”),
(Type__c = “CN”)),
(Amount__c > 1),
(Days_Past_Due__c >= 1)),
IMAGE(“/img/samples/color_red.gif”, “Red”, 10, 10),
IF(
AND(
(Type__c = “P2”),
(Amount__c > 1),
(Days_Past_Due__c <= 7)), IMAGE(“/img/samples/color_red.gif”, “Red”, 10, 10), IF( AND( (Type__c = “P2”), (Amount__c > 1),
(Days_Past_Due__c > 7)),
IMAGE(“/img/samples/color_yellow.gif”, “Yellow”, 10, 10),
IF(
AND(
(Type__c = “WT”),
(Amount__c > 1),
(Days_Past_Due__c <= 14)), IMAGE(“/img/samples/color_green.gif”, “Green”, 10, 10), IF( AND( (Type__c = “WT”), (Amount__c > 1),
(Days_Past_Due__c > 14),
(Days_Past_Due__c <= 21)), IMAGE(“/img/samples/color_yellow.gif”, “Yellow”, 10, 10), IF( AND( (Type__c = “WT”), (Amount__c > 1),
(Days_Past_Due__c > 21)),
IMAGE(“/img/samples/color_red.gif”, “Red”, 10, 10),
IF(
AND(
(Type__c = “WF”),
(Amount__c > 1),
(Days_Past_Due__c <= 28)), IMAGE(“/img/samples/color_green.gif”, “Green”, 10, 10), IF( AND( (Type__c = “WF”), (Amount__c > 1),
(Days_Past_Due__c > 28),
(Days_Past_Due__c <= 36)), IMAGE(“/img/samples/color_yellow.gif”, “Yellow”, 10, 10), IF( AND( (Type__c = “WF”), (Amount__c > 1),
(Days_Past_Due__c > 36)),
IMAGE(“/img/samples/color_red.gif”, “Red”, 10, 10),
IF(
AND(
(Type__c = “MT”),
(Amount__c > 1),
(Days_Past_Due__c <= 37)), IMAGE(“/img/samples/color_green.gif”, “Green”, 10, 10), IF( AND( (Type__c = “MT”), (Amount__c > 1),
(Days_Past_Due__c > 37),
(Days_Past_Due__c <= 45)), IMAGE(“/img/samples/color_yellow.gif”, “Yellow”, 10, 10), IF( AND( (Type__c = “MT”), (Amount__c > 1),
(Days_Past_Due__c > 45)),
IMAGE(“/img/samples/color_red.gif”, “Red”, 10, 10),
IF(
AND(
(Type__c = “MS”),
(Amount__c > 1),
(Days_Past_Due__c <= 67)), IMAGE(“/img/samples/color_green.gif”, “Green”, 10, 10), IF( AND( (Type__c = “MS”), (Amount__c > 1),
(Days_Past_Due__c > 67),
(Days_Past_Due__c <= 75)), IMAGE(“/img/samples/color_yellow.gif”, “Yellow”, 10, 10), IF( AND( (Type__c = “MS”), (Amount__c > 1),
(Days_Past_Due__c > 75)),
IMAGE(“/img/samples/color_red.gif”, “Red”, 10, 10),
NULL
))))))))))))))))))))
1) Reorganize/group the conditions by their outcome
Notice the repeated references to red, yellow and green image links scattered throughout the formula. That sequence of the conditions probably match what makes sense to the end user but this arrangement leads to redundancy in the formula.
Below is how it looked like when I started grouping the conditions for Green:
IF((Amount__c < 1), IMAGE(“/img/samples/color_green.gif”, “Green”, 10, 10),
IF( AND( (Type__c = “WT”), (Amount__c > 1), (Days_Past_Due__c <= 14)), IMAGE(“/img/samples/color_green.gif”, “Green”, 10, 10),
IF( AND( (Type__c = “WF”), (Amount__c > 1), (Days_Past_Due__c <= 28)), IMAGE(“/img/samples/color_green.gif”, “Green”, 10, 10),
IF( AND( (Type__c = “MT”), (Amount__c > 1), (Days_Past_Due__c <= 37)), IMAGE(“/img/samples/color_green.gif”, “Green”, 10, 10),
IF( AND( (Type__c = “MS”), (Amount__c > 1), (Days_Past_Due__c <= 67)),
IMAGE(“/img/samples/color_green.gif”, “Green”, 10, 10),
…
The purpose is to reorganize the conditions in preparation for the next step, which is:
2) Remove nested IFs – use ORs and line breaks
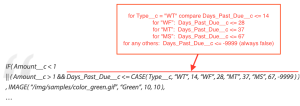
This is easier to show than to explain, but it means to replace the several nested IFs with a single IF with a long sequence of conditions, each condition separated by || which is the shorthand for OR.
It follows the pattern IF expression1 || expression2 || expression3 … where each OR expression is in a separate line for legibility (use Ctrl or Shift + Enter).
Each expression can (usually) contain nested ANDs.

Here is how it looks like for the Green conditions reorganized in the previous step.
Notice that now there is only a single reference to the green image link.
The compiled formula is now smaller because the redundant nested IFs and IMAGE references were replaced.
IF((Amount__c < 1)
|| AND( (Type__c = “WT”), (Amount__c > 1), (Days_Past_Due__c <= 14))
|| AND( (Type__c = “WF”), (Amount__c > 1), (Days_Past_Due__c <= 28))
|| AND( (Type__c = “MT”), (Amount__c > 1), (Days_Past_Due__c <= 37))
|| AND( (Type__c = “MS”), (Amount__c > 1), (Days_Past_Due__c <= 67)),
IMAGE(“/img/samples/color_green.gif”, “Green”, 10, 10),
…
Additionally, you can use && (shorthand for AND) and remove unneeded parenthesis:
This way you can further identify repeating patterns that you can optimize and eliminate redundancy.
At this point, the formula was pretty close to fitting the limit, but if the formula was lengthier, there are other optimizations to use.
3) Identify repeated conditions and create separate formulas/expressions for them… using a few tricks!
IF( Amount__c < 1
|| ( Type__c = “WT” && Amount__c > 1 && Days_Past_Due__c <= 14 )
|| ( Type__c = “WF” && Amount__c > 1 && Days_Past_Due__c <= 28 )
|| ( Type__c = “MT” && Amount__c > 1 && Days_Past_Due__c <= 37 )
|| ( Type__c = “MS” && Amount__c > 1 && Days_Past_Due__c <= 67 )
, IMAGE( “/img/samples/color_green.gif”, “Green”, 10, 10 ),
…
Notice in the above formula that for type WT the past due limit is 14, while type WF has limit of 28 and so forth for MT and MS? Notice how the amount > 1 condition is the same for all of the 4 cases.
You can condense all the “type-past due” conditions into a single CASE() function like below:
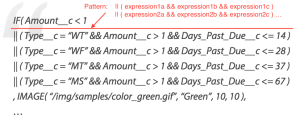
IF( Amount__c < 1
|| ( Amount__c > 1 && Days_Past_Due__c <= CASE( Type__c, “WT”, 14, “WF”, 28, “MT”, 37, “MS”, 67, -9999 ) )
, IMAGE( “/img/samples/color_green.gif”, “Green”, 10, 10 ),
…
That way Days_Past_Due__c will be compared to a different value depending on the Type__c. The -9999 is there just to fail the condition when the type is not one of the 4 (WT, WF, MT or MS).
The CASE expression could also be placed in a separate formula named “Past_Due_Limit_Per_Type__c” to help with legibility (it doesn’t reduce the compiled size of the formula though).
Another way of condensing multiple OR conditions like the ones found below is to use CONTAINS().
IF(
OR(
(Type__c = “TA”),
(Type__c = “DB”),
(Type__c = “AC”)),
IMAGE(“/img/samples/color_red.gif”, “Red”, 10, 10),
…
See below: you can use CONTAINS and group all the types to check in a single string with vertical pipes as delimiter. When the type matches TA, DB or AC, it will find the type inside the string “|TA|DB|AC|”.
IF( CONTAINS( “|TA|DB|AC|”, Type__c )
, IMAGE(“/img/samples/color_red.gif”, “Red”, 10, 10),
…
The higher the number of values to check, the more you benefit from this trick.
Beware of when the value does not have a fixed length: if Type__c is “A” it will match “TA” in the above expression, so be careful! To make the formula safer, you can use “|” + Type__c + “|” instead of Type__c.
In summary…
The 3 steps are:
-
Reorganize the complex formula by outcome/result
-
Replace nested IFs with the pattern OR ( exprA1 AND exprA2 AND … ) OR ( exprB1 AND exprB2 AND … )
-
Identify repeated conditions and create formula/expressions for them

Trying to resolve the Travelling Salesman Problem in Salesforce
Below is a screen showing one attempt at finding the best route to visit several accounts using the Artificial Bee Colony algorithm. The best route is defined as the route with minimal total sum of the distances between accounts. In other words, the route to spent the least amount of time and gas.
I am not sure anyone has ever had that problem to resolve in a Salesforce application but I found it was a good way to test my implementation of the Artificial Bee Colony (ABC) optimization algorithm, which could be used in many other optimization problems.
This implementation offers a fairly good approximation of the best route – definitely not the best route as you can see below: you would go from Plano to Richardson before Garland and then from Garland to Mesquite to save a few miles/gallons.

Travelling Salesman Problem in the DFW
The implementation is split into 2 main classes: the Hive, which implements the ABC algorithm, and the TravellingSalesmanProblem class, which is in charge of storing the accounts latitude/longitude, calculate the distances between accounts and getting the next best route.
Another interesting part is the Javascript code that uses the Google Map API to plot the route.

Plotting using the Google Map API
Other potential applications of the Travelling Salesman Problem could be:
- deciding the different routes each truck should follow in a delivery/courier company fleet
- wiring together memory elements in digital circuits in a sequence to minimize length of wire
- finding a sequence of advertising spots where ads from one company would not be shown immediately after its competitor (say, keep a Coke ad away from an Pepsi ad)
- in robotic welding, find a good sequence of tasks and path for the robot arm to weld the seams faster
- likewise, find the optimum path for a CNC machine to drill multiple holes
How to implement edit locking
When 2 users start editing the same record, the first user who saves the record wins, and the other user will lose the changes with an error message similar to “The record you were editing was modified by *someone* during your edit session. Please re-display the record before editing again.”
This can be an inconvenience: if an integration process updates the records, any user who opened the record for editing will lose his changes if he/she doesn’t hit Save quick enough.
To lock the record when the first user opens it for editing, you can implement the following 4 steps:
- Create a date/time field “Last Edit Date Time” – this field will store the date and time when the record was opened for editing.
- Create a validation rule to prevent any updates to the record during the period when it is locked (a period of 5 minutes so that no one can keep the record locked indefinitely).
- Create a Javascript “Edit” button that updates the “Last Edit Date Time” field and redirects to the record editing page.
- Replace the standard Edit button on the page layout with the custom Edit button.
First we create the field (this example uses Accounts):

Then we create the validation rule as follows:
AND( NOW() – PRIORVALUE( Last_Edit_Date_Time__c ) < ( 5/1440 )
/* locks for 5 minutes */
, PRIORVALUE( LastModifiedById ) != $User.Id )
The first line in this validation rule calculates how long since the last time the record was locked and compares the number to 5/1440 (5 minutes divided by the number of minutes in a day).
If it is less than 5 minutes, then, on the second line, it checks whether the user doing the update is the same user that set the edit lock.
If it is the same user, it will allow the update to go through, but if it is a different user, it shows an error message. I chose the error message to be “The record is locked for editing by another user (5 minutes duration).”
Lastly, we need to create a new Button on Account to run Javascript code that updates the Last_Edit_Date_Time__c and redirects to the the account standard editing page:

This is the Javascript code:
{!REQUIRESCRIPT("/soap/ajax/29.0/connection.js")}// prepare account for updating the last edit date time
var anAccount = new sforce.SObject( "Account" );
anAccount.id = '{!Account.Id}';
var dtNow = new Date();
var nowInJSON = dtNow.toJSON();
anAccount.Last_Edit_Date_Time__c = nowInJSON;// update the account
var result = sforce.connection.update( [ anAccount ] );window.location.href = '/{!Account.Id}/e';
Now we need to just remove the standard Edit button and place the new custom Edit button on the page layout.

This makes it so that if an user clicks Edit, it will set the Last Edit Date Time. The validation rule will prevent updates to the record from anyone else during the next 5 minutes. If another user attempts to save the same record, the validation rule will cause this error message to appear:

Another trick: how to obtain a set from any field in a list – faster and without loops!
This is like the previous post about getting maps out of a list, but with the same trick applied for getting a set.
In triggers, we usually code a loop like below to collect certain IDs in a set and later use the set in a query.
…
Set<String> acctIDSet = new Set<String>();
for( Contact aContact : trigger.new ) {
acctIDSet.add( aContact.AccountID );
}
…
The new SetCreator class does that without any loops and in a single line of code.
Set<String> acctIDSet =
SetCreator.createSetFromField( trigger.new, ‘AccountID’ );
Below is the definition of the SetCreator class that allows that.
public class SetCreator {

    public static Set<String> createSetFromField(

        List<SObject> aList, String fieldName ) {
// get the list in JSON format
String jsonList = JSON.serialize( aList );// copy only the fieldName value using RegEx substitution
jsonList = jsonList.replaceAll(
'(\\{.*?"' + fieldName + '":"(.*?)"(,".*?")*\\},?)'
, ',"$2"' ).replace( '[,', '[' );// create set from the modified JSON
Set<String> extractedSet =
(Set<String>) JSON.deserialize(
jsonList, Set<String>.class );return extractedSet;
}}
It converts the list to a JSON string and modifies the string to look as if it was a serialized Set. It uses RegEx to keep the specified field values and remove everything else. It then deserializes the modified JSON string into a Set.
Again, there are no explicit loops – all of them are internal to the RegEx/JSON implementations, and are much faster.
Even if there are duplicates, they are automatically eliminated during the deserialization of the JSON string.
Trick: How to obtain a map indexed by any field (not just ID) faster and without loops!
Often we query an object and need to create a map out of the list of records retrieved. The most straightforward way is to declare a Map<ID, sObject> and initialize it with a list resulting from a SOQL query.
List<Account> acctList = [ SELECT ID, Name, AccountNumber
FROM Account ];Map<ID, Account> acctMapByID = new Map<ID, Account>( acctList );
The code shown above will populate the acctMapByID with accounts using their IDs as the key.
However, what if we wanted to create a map indexed by AccountNumber instead? We would have to loop through the list and add the records to the map one by one specifying theAccountNumber as the key.
List<Account> acctList = [ SELECT ID, Name, AccountNumber
FROM Account ];Map<String, Account> acctMapByNumber =
new Map<String, Account>();for( Account anAccount : acctList ) {
acctMapByNumber.put( anAccount.AccountNumber, anAccount );
}
Now what if there was a way to do that without any loops and in a single line of code?
Map<String, SObject> acctMapByNumber =

       MapCreator.createMapByIndex( acctList, 'AccountNumber' );
Below is the definition of the MapCreator class that allows that.
public class MapCreator {

    public static Map<String, SObject> createMapByIndex(

        List<SObject> aList, String indexField ) {
// get the list in JSON format
String jsonList = JSON.serialize( aList );// remove enclosing []
jsonList = jsonList.substring( 1, jsonList.length() - 1 );// copy the indexField value in front of each
// {} group using RegEx substitution
// example result: value:{..."indexField":"value"...}
jsonList = '{' + jsonList.replaceAll(
'(\\{.*?"' + indexField + '":"(.*?)"(,".*?")*\\},?)'
, '"$2":$1' ) + '}';// create map from the modified JSON
Map<String, SObject> changedMap =
(Map<String, SObject>) JSON.deserialize(
jsonList, Map<String, SObject>.class );return changedMap;
}}
It first converts the list to a JSON string, then modifies the string to look as if it was a serialized Map. It does that by using RegEx to insert the index in front of each record in the string. It then deserializes the modified JSON string into a map.
It doesn’t use any loops explicitly although there must be loops hidden in the RegEx and JSON method internal implementations, which are much faster.
What would be the advantages of using this class instead of coding the loop?
The MapCreator class uses string replacement/RegEx, which is faster than looping and creating map elements one by one.
According to my tests, it runs faster than looping for lists of roughly 8 records or more. For 63 records, it should be 5 to 6 times faster depending on the size of the records.
It might not be relevant for most of the situations but if you have a long running code that needs to be optimized, it might be worth a try.
PS.: I fixed a problem with the way WordPress displays code that made it convert quotes and double-quotes to special characters. Now the code can be copied and pasted onto Salesforce.
How to clone a custom object in Salesforce/Eclipse
This is how you can create a new custom object with the same fields as an existing custom object:
1) Download custom objects in Eclipse
– right-click the project in the ‘Package Explorer’ window
– in the popup menu, select ‘Force.com/Project Properties’

– in the properties window, select ‘Force.com/Project Contents’
– click ‘Add/Remove’, then make sure that the ‘objects – custom component’ is checked

– click ‘Apply’ and respond Yes to the ‘Refresh Project From Server’ dialog

2) Create new object in Eclipse
– right-click the ‘objects’ folder, then select ‘New/Custom Object’

– give it a label, plural label and a name, then save it
3) Copy existing object fields to the Clipboard
– right-click the object, then select ‘Open With/Text Editor’

– copy to the Clipboard the part from the first line of <fields> to the last line of </fields>
– it is usually between <enableReports> and <label>

4) Insert fields into the new object
– right-click the new object created in step 2, then select ‘Open With/Text Editor’
– locate the line with <enableReports> and paste the Clipboard contents right below it, before the <label> line

5) Repeat steps 3 and 4 for any other needed configurations
– for example, you may need to copy the lines with the following tags: <listViews>, <searchLayouts>, <validationRules>, <recordTypes>
6) Save the new altered object
– look at the ‘Problems’ tab at the bottom for any error messages, they will indicate what you need to change to make the object accepted
– problems to look for: relationship names will need to be changed to be different from the existing object’s relationships ( <relationshipLabel> and <relationshipName>)
– focus on first renaming relationship names like below to avoid duplicates and the rest of the formulas should work thereafter (the errors xxx__r doesn’t exist are because a relationship could not be created due to duplicate relationship names)

– after all errors are resolved, the object will be saved
